
Web Scraping with SeleniumBase and Python in 2026
Learn how to web scrape using SeleniumBase and Python in 2025. Discover techniques, tips, and best practices for efficient data extraction

If you're looking for a stealthier and even easier alternative to Selenium for web scraping in Python, SeleniumBase might actually be the answer.
SeleniumBase is used for automation testing and has built-in tools for web scraping. And it works with modern browsers and even helps bypass anti-bot defenses.
In this guide we'll cover:
- Setting up a basic SeleniumBase scraper.
- Automating web interactions.
- Avoiding common anti-bot measures.
What Is SeleniumBase?
SeleniumBase is an open-source Python framework built on top of Selenium to simplify automation testing and web scraping with less code. One very important feature of SeleniumBase in scraping is its Undetected ChromeDriver (UC) mode, which increases the chances of bypassing anti-bot measures. It also provides smoother interactions on websites, with security features like CAPTCHA-clicking, making web scraping a lot easier.
That said, SeleniumBase supports the pytest plugin, which is specifically useful for customizing test runs during automation testing. With command-line options, you can actually set the browser type, enable headless mode, configure proxies, change user agents... (and more.)
SeleniumBase also offers seamless proxy configuration to anonymize requests, enabling you to avoid IP bans during scraping. For more details, check out our detailed guide on how to set up SeleniumBase with proxies.
Building a Basic Scraper with SeleniumBase
Using this e-commerce demo website as our target website, let's create a basic scraper with SeleniumBase to extract the full HTML of the page. Here's a preview of what the target page looks like:
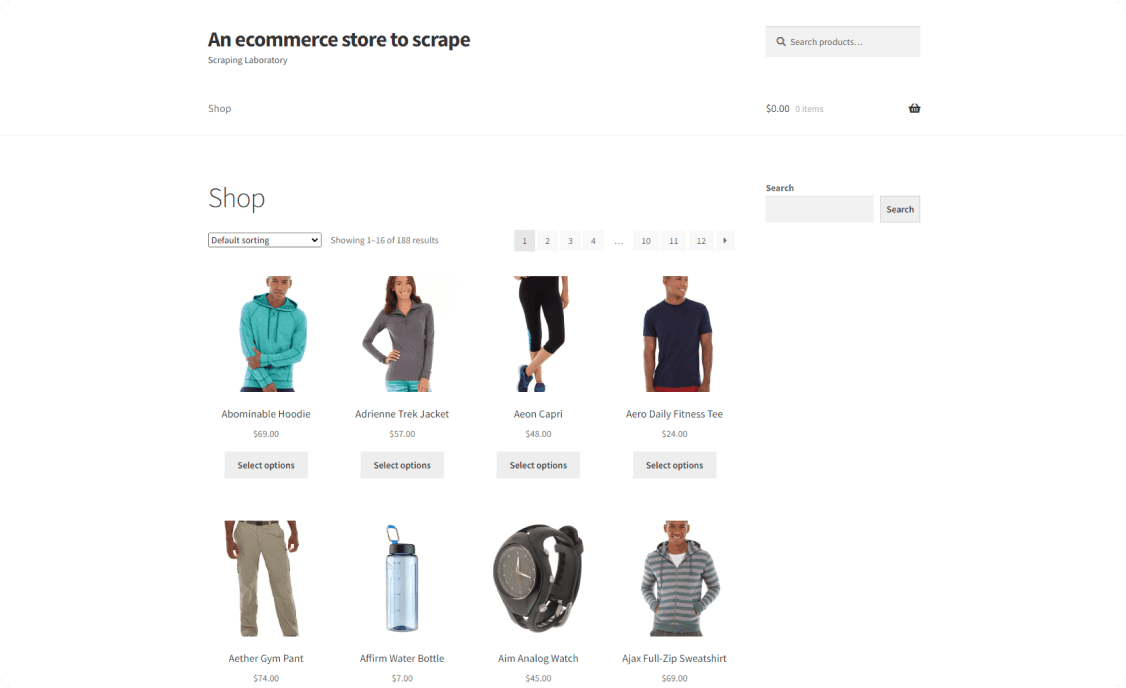
This tutorial assumes you already have Python installed. If not, install the latest version from the Python download page.
Next, install SeleniumBase by running the following command in your terminal:
pip3 install seleniumbase
Import Driver from seleniumbase. Open the target page and then use the get_page_source() method to fetch the raw HTML:
# pip3 install seleniumbase
from seleniumbase import Driver

# initialize the driver in headless mode
driver = Driver(headless=True)

# open the target website
driver.open("https://www.scrapingcourse.com/ecommerce/")

# extract the full-page HTML
page_html = driver.get_page_source()

# print HTML
print(page_html)
The above code extracts the website's full-page HTML, as shown below:
<!DOCTYPE html>
<html lang="en-US">
<head>
    <!--- ... --->

    <title>Ecommerce Test Site to Learn Web Scraping - ScrapingCourse.com</title>

  <!--- ... --->
</head>
<body class="home archive ...">
    <p class="woocommerce-result-count" id="result-count">Showing 1-16 of 188 results</p>
    <ul class="products columns-4" id="product-list">

        <!--- ... --->

    </ul>
</body>
</html>
Awesome! You've just built a simple SeleniumBase scraper. Now, let's build on this to extract specific product details.
Skip the blocks. Try Zenrows free and get clean web data without the anti-bot fight.
Extracting Data with SeleniumBase
SeleniumBase supports CSS selectors, XPath, and IDs to target specific web elements. It also has built-in wait mechanisms to ensure that elements are fully loaded before interacting with them, making it reliable for scraping dynamic content or JavaScript-heavy websites.
From the target website, you'll scrape the product's names, image sources, and product URLs on the target page.
Scraping Product Names
Let's start by scraping product names. First, inspect the webpage to identify the HTML structure of the product name.
Right-click on a product name on the target page and select Inspect. All the products are inside li tags, while the product names are inside h2 tags with a class name product-name.
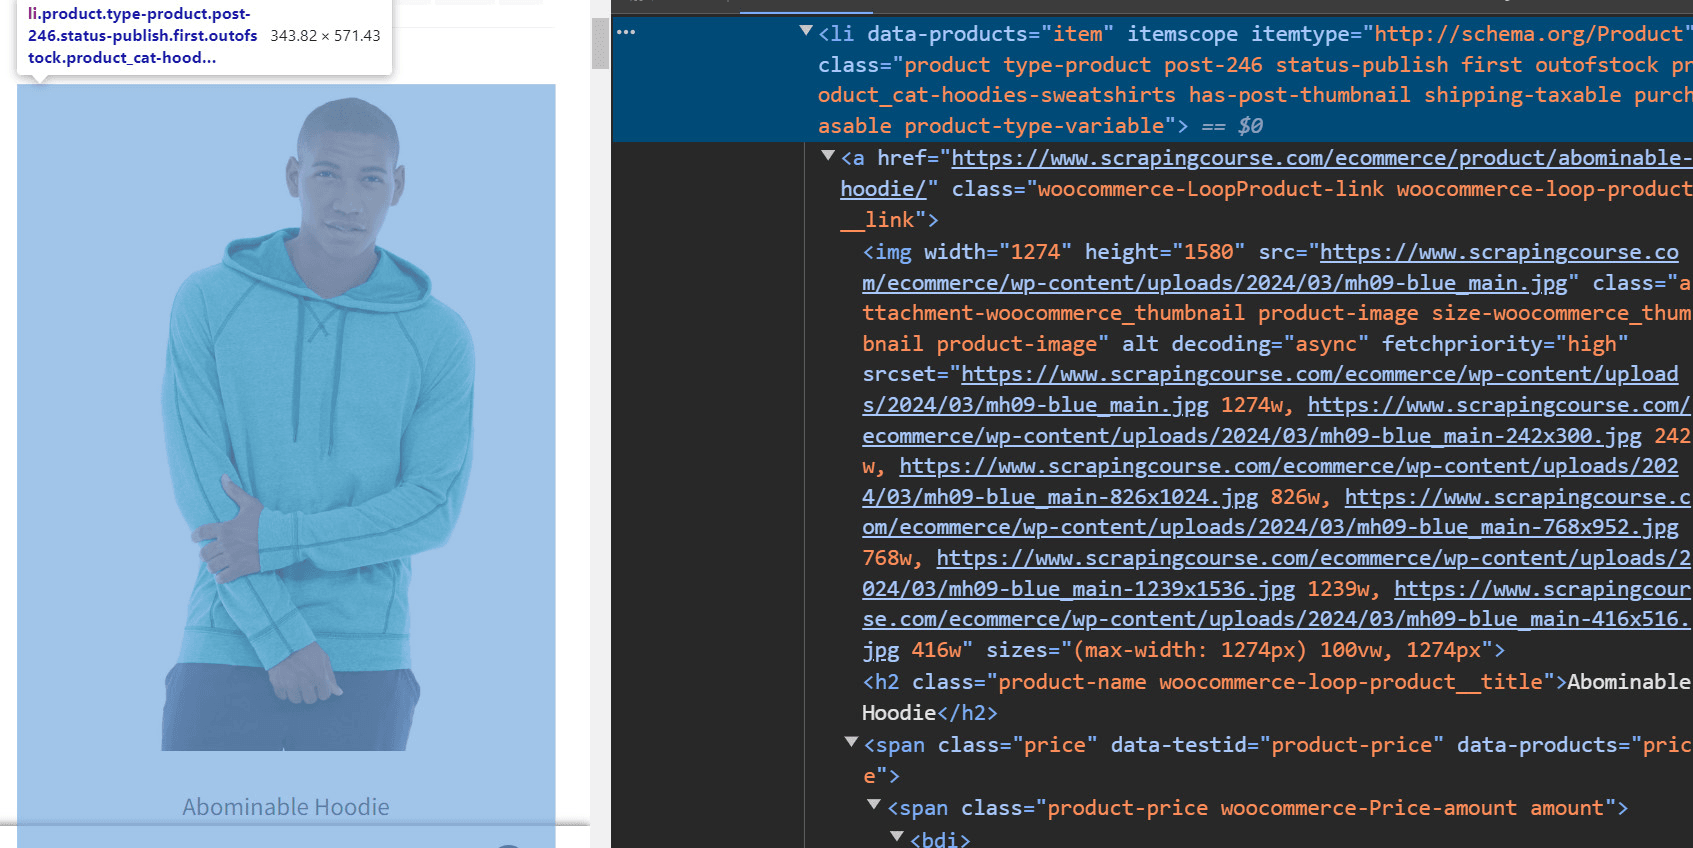
Next, create a product_data array to store the extracted product information. Use the find_elements method to locate all the product containers by a common CSS selector. Loop through each container to extract and store the product names in the product_data array:
# pip3 install seleniumbase
from seleniumbase import Driver

# initialize the driver in headless mode
driver = Driver(headless=True)

# open the target website
driver.open("https://www.scrapingcourse.com/ecommerce/")

# create a dictionary to store the product details
product_data = []

# find all product containers using the CSS selector
products = driver.find_elements("css selector", ".product")

# loop through the product container
for product in products:
    product_name = product.find_element("css selector", ".product-name").text

    # create a dictionary for this product
    data = {
        "product_name": product_name,
    }

    # append the scraped data
    product_data.append(data)
Awesome progress! Let's continue.
Scraping Product Images
Next, you'll scrape the product images. Right-click an image and select Inspect to locate the img tag with the class name product-image.
Use the find_element method to locate all the image elements within the parent container. Then, use the get_attribute method to extract the image URLs. The URLs are stored in the product_data dictionary:
# ...

# loop through the product container
for product in products:
    # ...
    image_url = product.find_element("css selector", ".product-image").get_attribute("src")

    # create a dictionary for this product
    data = {
        "Image URL": image_url,
    }

    # ...
Great! Let's move on.
Scraping Product Links
Finally, let's extract the links to each product. Right-click on a product link and select Inspect. The product links are inside anchor a tags with the class name woocommerce-LoopProduct-link.
Use the find_element method to locate each product link from the parent container. Use the get_attribute method to extract the href attributes:
# ...

# loop through the product container
for product in products:
    # ...
    product_url = product.find_element(
        "css selector", "a.woocommerce-LoopProduct-link"
    ).get_attribute("href")

    # create a dictionary for this product
    data = {
        "URL": product_url,
    }

    # ...
Nice work so far!
Now, let's put everything together into a complete scraper and print the product_data array:
# pip3 install seleniumbase
from seleniumbase import Driver

# initialize the driver in headless mode
driver = Driver(headless=True)

# open the target website
driver.open("https://www.scrapingcourse.com/ecommerce/")

# create a dictionary to store the product details
product_data = []

# find all product containers using the CSS selector
products = driver.find_elements("css selector", ".product")

# loop through the product container
for product in products:
    product_name = product.find_element("css selector", ".product-name").text
    image_url = product.find_element("css selector", ".product-image").get_attribute(
        "src"
    )
    product_url = product.find_element(
        "css selector", "a.woocommerce-LoopProduct-link"
    ).get_attribute("href")

    # create a dictionary for this product
    data = {
        "product_name": product_name,
        "Image URL": image_url,
        "URL": product_url,
    }

    # append the scraped data
    product_data.append(data)

# print the product data dictionary
print(product_data)
Here's the output of the combined code:
[
    {
        "product_name": "Abominable Hoodie",
        "Image URL": "https://www.scrapingcourse.com/ecommerce/wp-content/uploads/2024/03/mh09-blue_main.jpg",
        "URL": "https://www.scrapingcourse.com/ecommerce/product/abominable-hoodie/",
    },

    # ... omitted for brevity,

    {
        "product_name": "Artemis Running Short",
        "Image URL": "https://www.scrapingcourse.com/ecommerce/wp-content/uploads/2024/03/wsh04-black_main.jpg",
        "URL": "https://www.scrapingcourse.com/ecommerce/product/artemis-running-short/",
    },
]
Congrats! You've now successfully built a full scraper with SeleniumBase to extract product details.
Automating Browser Interactions
So far, we've focused on extracting content from a static page. But what if you need to simulate real browser interactions?
With SeleniumBase, you can easily mimic various browser activities, such as scrolling, clicking, filling out forms, logging in, and more. This is especially useful when dealing with dynamic pages that require user input or interaction.
In this section, you'll learn how to simulate browser interactions and capture a screenshot of a product page after logging in. We'll use a simple login challenge page, which requires authentication before accessing product data:
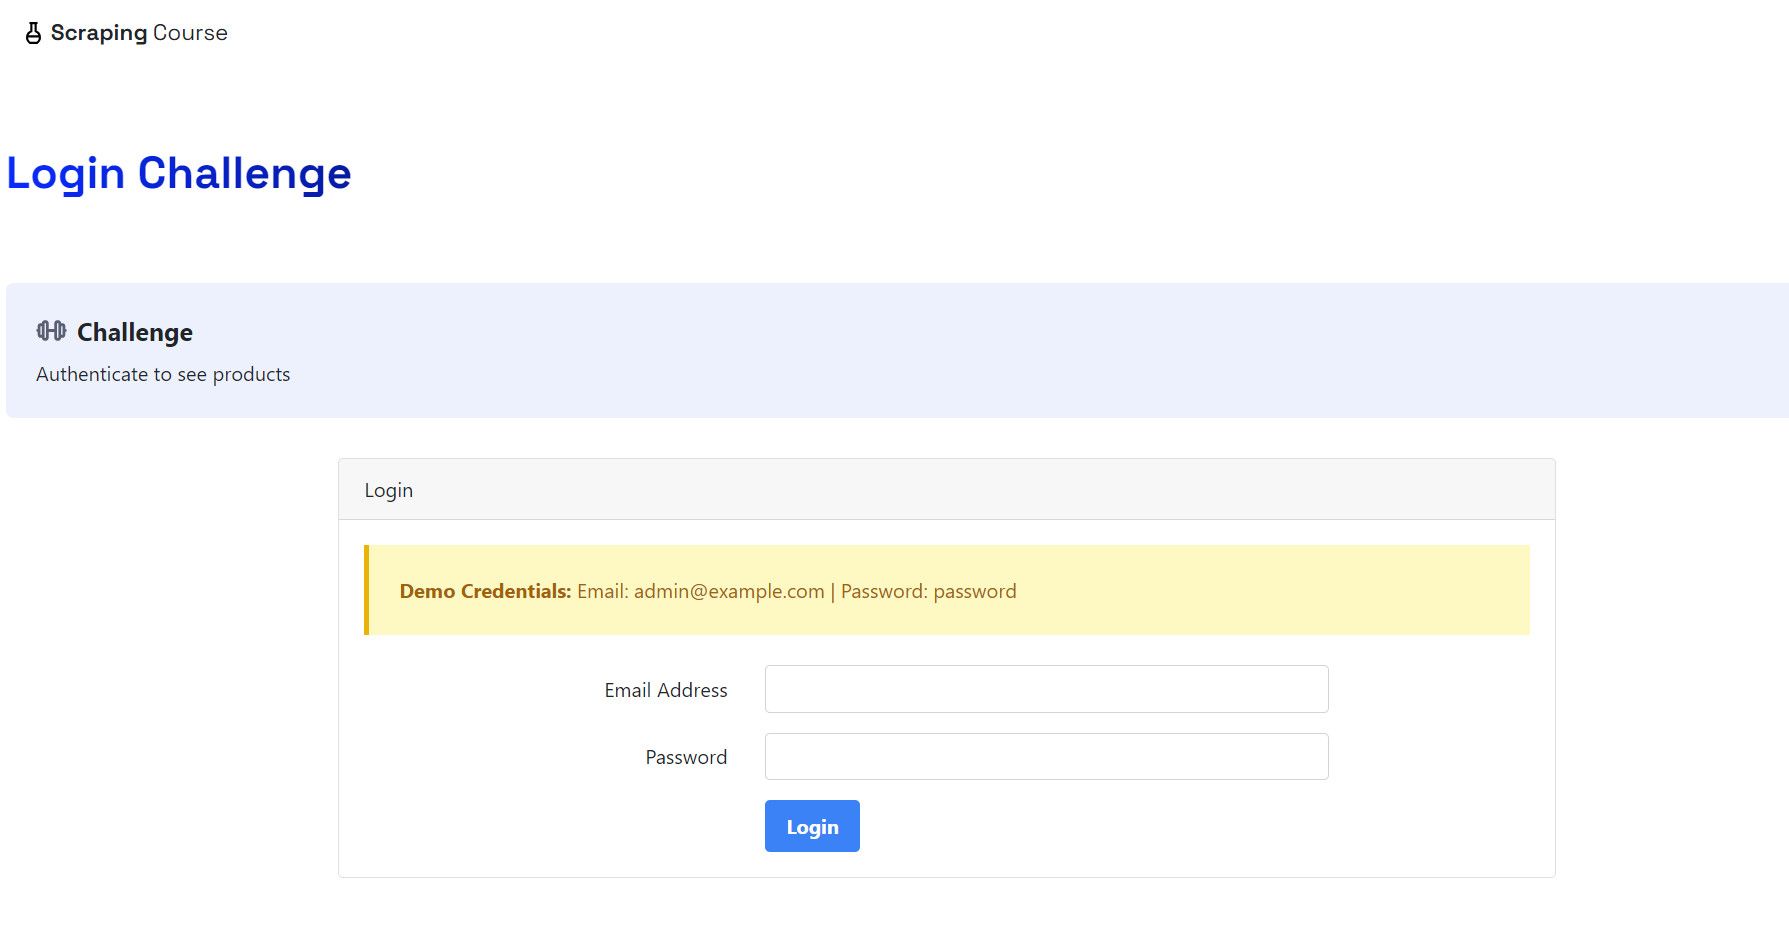
Open the login challenge page and input the credentials. Then, click the login button and capture a screenshot of the product page:
# pip3 install seleniumbase
from seleniumbase import Driver

# initialize the driver in headless mode
driver = Driver(headless=True)

# open the target website
driver.open("https://www.scrapingcourse.com/login")

# enter the demo email
driver.type("#email", "admin@example.com")

# enter the demo password
driver.type("#password", "password")

# click the login button
driver.click('button[type="submit"]')

driver.sleep(10)

# take a screenshot after clicking login
driver.save_screenshot("login_screenshot.png")
The above script will automate the logging process and save the screenshot of the project page in your project directory.
And that's it! You've successfully used SeleniumBase to automate browser interactions.
Avoiding Blocks with SeleniumBase
You now know how to perform basic web scraping operations using SeleniumBase. However, it's important to understand that many websites use advanced anti-bot measures, such as CAPTCHA challenges, IP bans, behavioral monitoring, etc., to block scrapers.
These protections make data retrieval difficult, as your scraper might be flagged and blocked as non-human traffic. That's why it's important to know how to scrape without getting blocked.
SeleniumBase UC Mode provides enhanced capabilities for bypassing anti-bot detection systems. It allows your scrapers to mimic human behavior. The UC mode is based on an improved version of Undetected ChromeDriver and implements several evasion measures, including automatically changing User Agents, automatically setting Chromium arguments, special uc_*() methods for bypassing CAPTCHAs, and more.
Let's try to scrape the anti-bot challenge page using Seleniumbase in UC Mode. The target page contains an interstitial page with forced CAPTCHA. We'll attempt to bypass this block by simulating CAPTCHA-clicking.
Initialize the browser using UC mode. SeleniumBase only supports CAPTCHA clicking in the GUI mode. So, ensure you run the browser in non-headless mode to enable this feature. Navigate to the target URL. Use uc_open_with_reconnect and uc_gui_click_captcha to evade detection and handle the CAPTCHA:
# import the Driver class from seleniumbase
from seleniumbase import Driver

# initialize driver with UC mode enabled
driver = Driver(uc=True)

# set target URL
url = "https://www.scrapingcourse.com/antibot-challenge"

# open URL using UC mode with a 4-second reconnect time to bypass initial detection
driver.uc_open_with_reconnect(url, reconnect_time=4)

# attempt to click the CAPTCHA checkbox
driver.uc_gui_click_captcha()

# wait for CAPTCHA solving
driver.sleep(10)

# retrieve and print the page source after bypassing anti-bot measures
page_html = driver.get_page_source()
print(page_html)

# close the browser and end the session
driver.quit()
Note
The
uc_gui_click_captcha()method of SeleniumBase is only available in the GUI mode. Ensure you maintain the default non-headless mode while clicking a CAPTCHA.
The code returns the following output:
<html lang="en">
<head>
    <!-- ... -->
    <title>Antibot Challenge - ScrapingCourse.com</title>
    <!-- ... -->
</head>
<body>
    <!-- ... -->
    <h2>
        You bypassed the Antibot challenge! :D
    </h2>
    <!-- other content omitted for brevity -->
</body>
</html>
Bravo! You bypassed the anti-bot challenge to retrieve the HTML of the target page.
Limitations of SeleniumBase
Although SeleniumBase can help you bypass anti-bots in some cases, it's not always reliable and effective at scale. It still gets detected in headless mode.
And since the CAPTCHA clicking feature is only available in GUI mode, bypassing blocks becomes increasingly memory-intensive, making the tool unsuitable for large-scale web scraping.
Also, the tool is open-source, so anti-bot developers can gain insights into its bypass mechanisms and block it.
So, how can you overcome the limitations of SeleniumBase? The next section presents a better alternative to SeleniumBase.
Best Alternative to SeleniumBase
The ZenRows Universal Scraper API addresses the challenges of modern web scraping. It bypasses CAPTCHAs and other anti-bot mechanisms, achieving a success rate of up to 99.93%.
ZenRows is easy to use and requires zero maintenance effort, enabling you to focus on core business logic rather than wasting time and resources bypassing blocks. It's also lightweight, featuring headless browser capabilities that enable seamless interaction with dynamic web pages.
To demonstrate its capabilities, let's use it to scrape the same protected site we attempted with SeleniumBase.
To get started, sign up for ZenRows. After logging in, you'll be redirected to the Request Builder page. Enter the target URL in the link box, activate Premium Proxies, and enable JS Rendering boost mode.
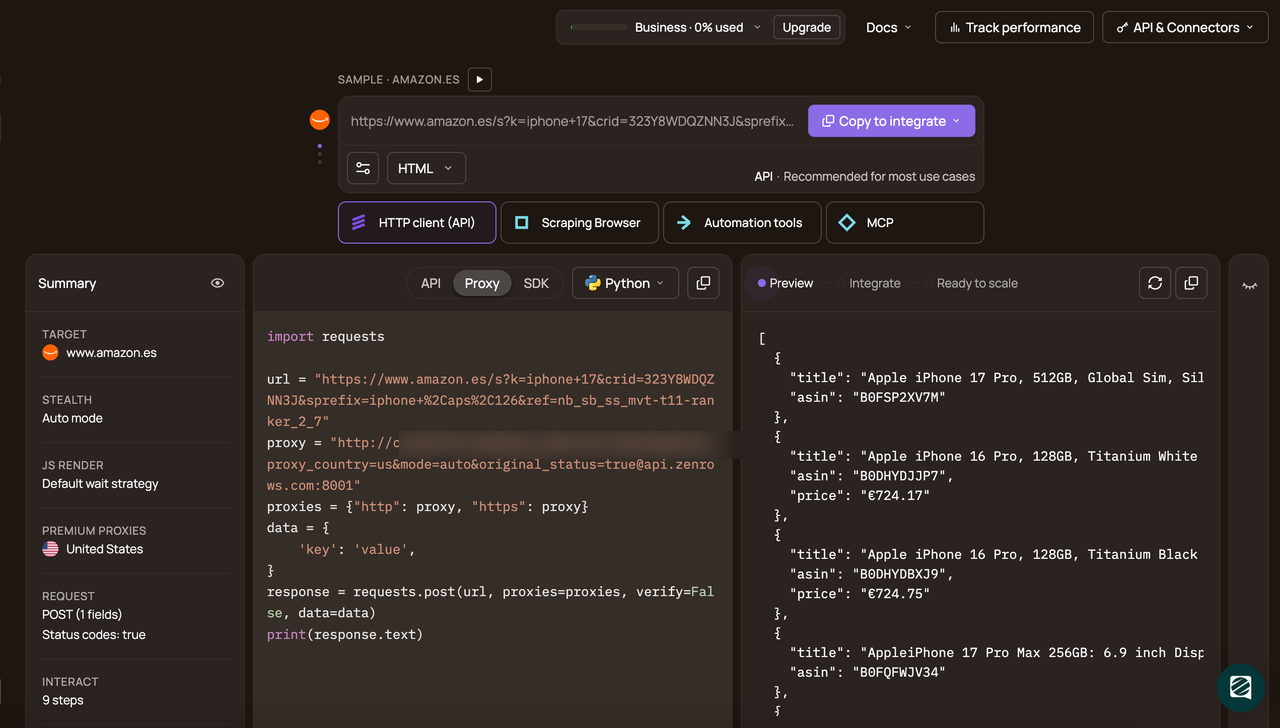
Select your programming language (e.g., Python) and choose the API connection mode. Then, copy and paste the generated code into your scraper.
The Request Builder will generate Python code similar to this:
# pip install requests
import requests

url = "https://www.scrapingcourse.com/antibot-challenge"
apikey = "<YOUR_ZENROWS_API_KEY>"

params = {
    "url": url,
    "apikey": apikey,
    "js_render": "true",
    "premium_proxy": "true",
}

response = requests.get("https://api.zenrows.com/v1/", params=params)
print(response.text)
After running this code, you'll receive the whole HTML content of the target page:
<html lang="en">
<head>
    <!-- ... -->
    <title>Antibot Challenge - ScrapingCourse.com</title>
    <!-- ... -->
</head>
<body>
    <!-- ... -->
    <h2>
        You bypassed the Antibot challenge! :D
    </h2>
    <!-- other content omitted for brevity -->
</body>
</html>
Congratulations! 🎉 Your scraper can now reliably bypass any anti-bot measure at scale.
ZenRows is your one-stop solution for your web scraping needs. It can handle even the most secure websites at scale, making it the perfect choice for large-scale, enterprise-grade web scraping.
Conclusion
This tutorial covered the most essential concepts for web scraping in Python using SeleniumBase. You now know how to:
- Set up SeleniumBase for web scraping.
- Extract text, images, and links from a web page.
- Automate browser interactions, such as logging into websites.
- Bypass anti-bot measures.
Web scraping presents numerous challenges, particularly with the advanced anti-bot technologies used by many modern websites. Consider using a solution like the ZenRows to bypass even the most sophisticated anti-bot systems and scrape without interruptions.