
A Complete Guide to Web Scraping With Crawlee
Learn step by step how to scrape the web with Crawlee, including its key features, limitations, and how to avoid being blocked.

Most sites render content dynamically, so the HTML you fetch is missing the data you need. Other targets work fine with regular HTTP clients, but you’ll still need to handle pagination and request failures like timeouts and rate limits as you scale up.
Crawlee supports both static and dynamic site crawling and also lets you queue, retry, and run concurrent requests. In this article, you’ll learn what Crawlee is, its key features, and its limitations.
What Is Crawlee?
Crawlee is a web scraping library with built-in web crawling features. It’s available for JavaScript, TypeScript, and Python.
Crawlee is built around a simple crawl loop. You start from one or more URLs, push follow-up URLs as you discover them, and extract the data you need from each page. It also includes dataset and key-value store primitives, so you can store extracted rows separately from files and the crawler's execution state.
You run Crawlee in two main modes, depending on the page's needs. One is standard HTTP crawling, which fetches a response and parses the HTML. This is good for scraping static websites where the data is already present in the markup.
The other mode is Browser crawling, which runs a real browser via Playwright or Puppeteer, allowing the page to execute JavaScript before you extract data. This is best for JavaScript-heavy sites where content loads after the initial HTML.
Crawlee Features
Crawlee ships with many features that make scraping projects easier to manage. Here are the ones you’ll use most.
Crawler Classes
Crawler classes let you choose how Crawlee fetches pages. Use an HTTP crawler when the data you need is already in the initial HTML response. Use a browser crawler when the page needs JavaScript rendering or page interactions before you can extract data. Switching crawler classes doesn’t change the crawl pattern, so the rest of your code stays similar.
Request Queues
Request queues are how Crawlee tracks what page to visit next. You start with seed URLs, then enqueue pagination and detail links as your handler finds them. This prevents you from hard-coding every URL and helps the crawler follow the site’s structure. Queues also help with deduplication, so you don’t reprocess the same URL.
Result Storage
Crawlee stores outputs in separate storage types so data stays organized. It uses a feature dataset with structured rows, such as products or listings. For execution artifacts and state like HTML snapshots, screenshots, or JSON blobs, it uses a key-value store. You can name datasets so each crawler writes into its own folder.
Retries And Error Handling
Retries are built into crawlers, so you don’t need custom retry loops. You set retry limits and handler timeouts so single-page failures don’t end a scraping request. Crawlee also supports failure hooks, which let you log errors or save debug output. This keeps a clean record of what failed and why.
CLI Project Bootstrap
The Crawlee CLI scaffolds a runnable project with a standard layout. It creates the folder structure, installs dependencies, and includes example code you can run right away. This is a quick way to confirm your environment works before you write crawl logic. After that, you can replace the template files with your own scripts.
Let’s now have a look at how Crawlee actually runs a crawl.
How Crawlee Works
Crawlee runs in a simple loop. A crawl starts from one or more seed URLs, passed to crawler.run() or loaded into a request list or queue. Crawlee pulls the next request, calls requestHandler for that page, and continues until the queue is empty.
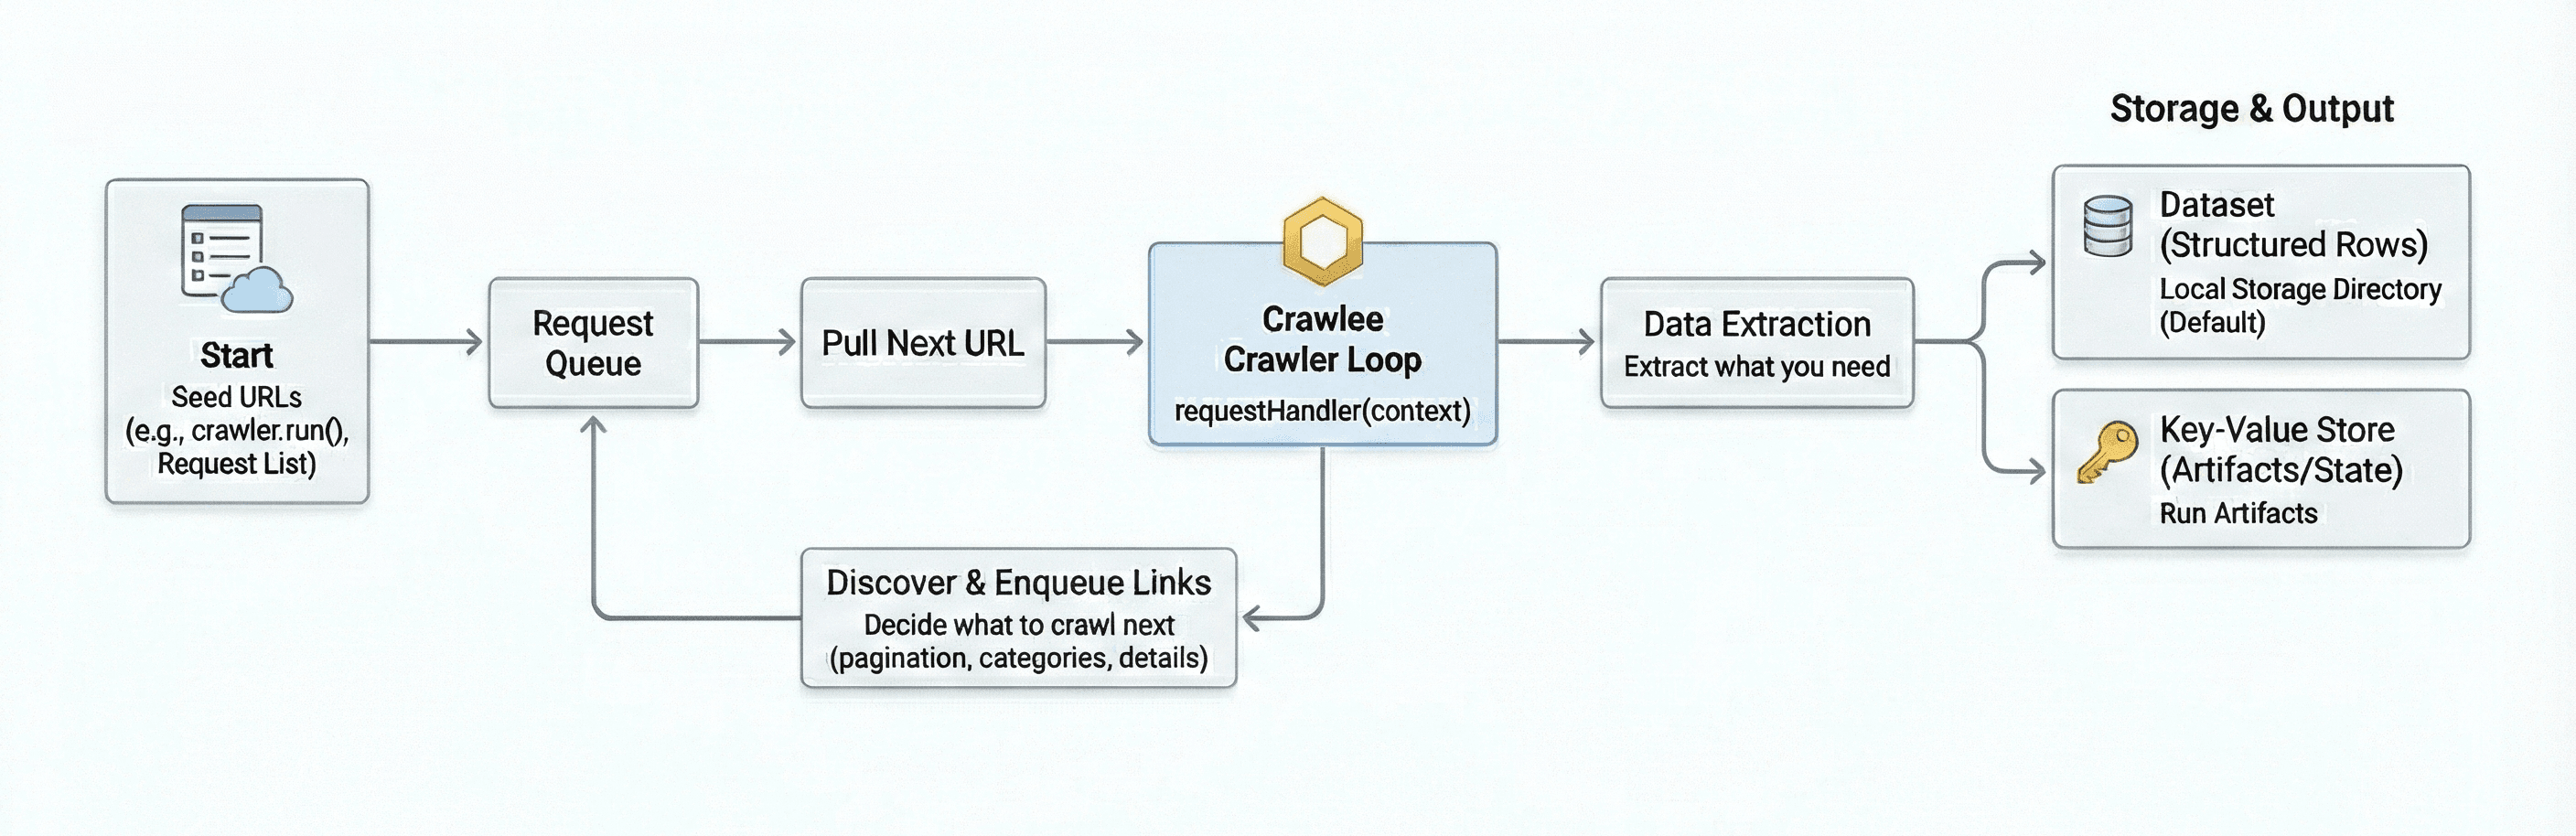
The requestHandler is where extraction and discovery happen. The handler extracts data from the current page, then enqueues follow-up URLs such as pagination pages, category pages, and detail pages. Crawlee provides the enqueueLinks() helper to collect links from the current page and add matching URLs to the queue. As the crawl runs, Crawlee writes outputs to storage.
How to Scrape With Crawlee
In this section, you’ll learn how to scrape with Crawlee step by step. You’ll start with CheerioCrawler on an HTML-first page, then apply the same approach to a JavaScript-rendered page to see its limits. From there, you’ll switch to a local browser crawler to extract dynamic content. This'll help you understand when to apply each crawler method.
Setting Up Your Environment
The recommended way to start a new Crawlee project is to use the Crawlee Command Line Interface (CLI). It creates a ready-to-run project with the correct structure and dependencies, so you can confirm the setup before writing any crawl logic.
Create a new project with the CLI.
npx crawlee create ecommerce-scraper
When prompted to select the template for your Crawlee project, select Getting started example [JavaScript]. Choosing JavaScript ensures your project matches the code we’ll be writing in this article.
After the setup finishes, move into the project folder and run the starter main.js example that was generated during setup. You'll find this file inside the src directory of your project.
cd ecommerce-scraper
npm start
If you receive an error about missing Playwright browser binaries, install them and rerun the starter.
npx playwright install
npm start
Once npm start finishes, open storage/datasets/default/. The starter example crawls pages on the Crawlee website and saves one record per visited URL. Open storage/datasets/default/000000001.json. You should see a JSON object with the page URL and its <title> text, similar to this.
{
	"title": "Crawlee · Build reliable crawlers. Fast.",
	"url": "https://crawlee.dev/"
}
This confirms that local storage is working and Crawlee is saving crawl output correctly.
You can also install Crawlee with npm install crawlee. This skips the CLI scaffold, so you’ll create the project structure and starter code yourself. If you plan to use browser-based extraction, install Playwright or Puppeteer separately because they aren’t bundled with Crawlee.
Web Scraping Using CheerioCrawler
Before you see how Crawlee scrapes JavaScript-rendered pages, start with CheerioCrawler and see where it excels and where it fails. It fetches a page over HTTP, then parses the raw HTML response with Cheerio.
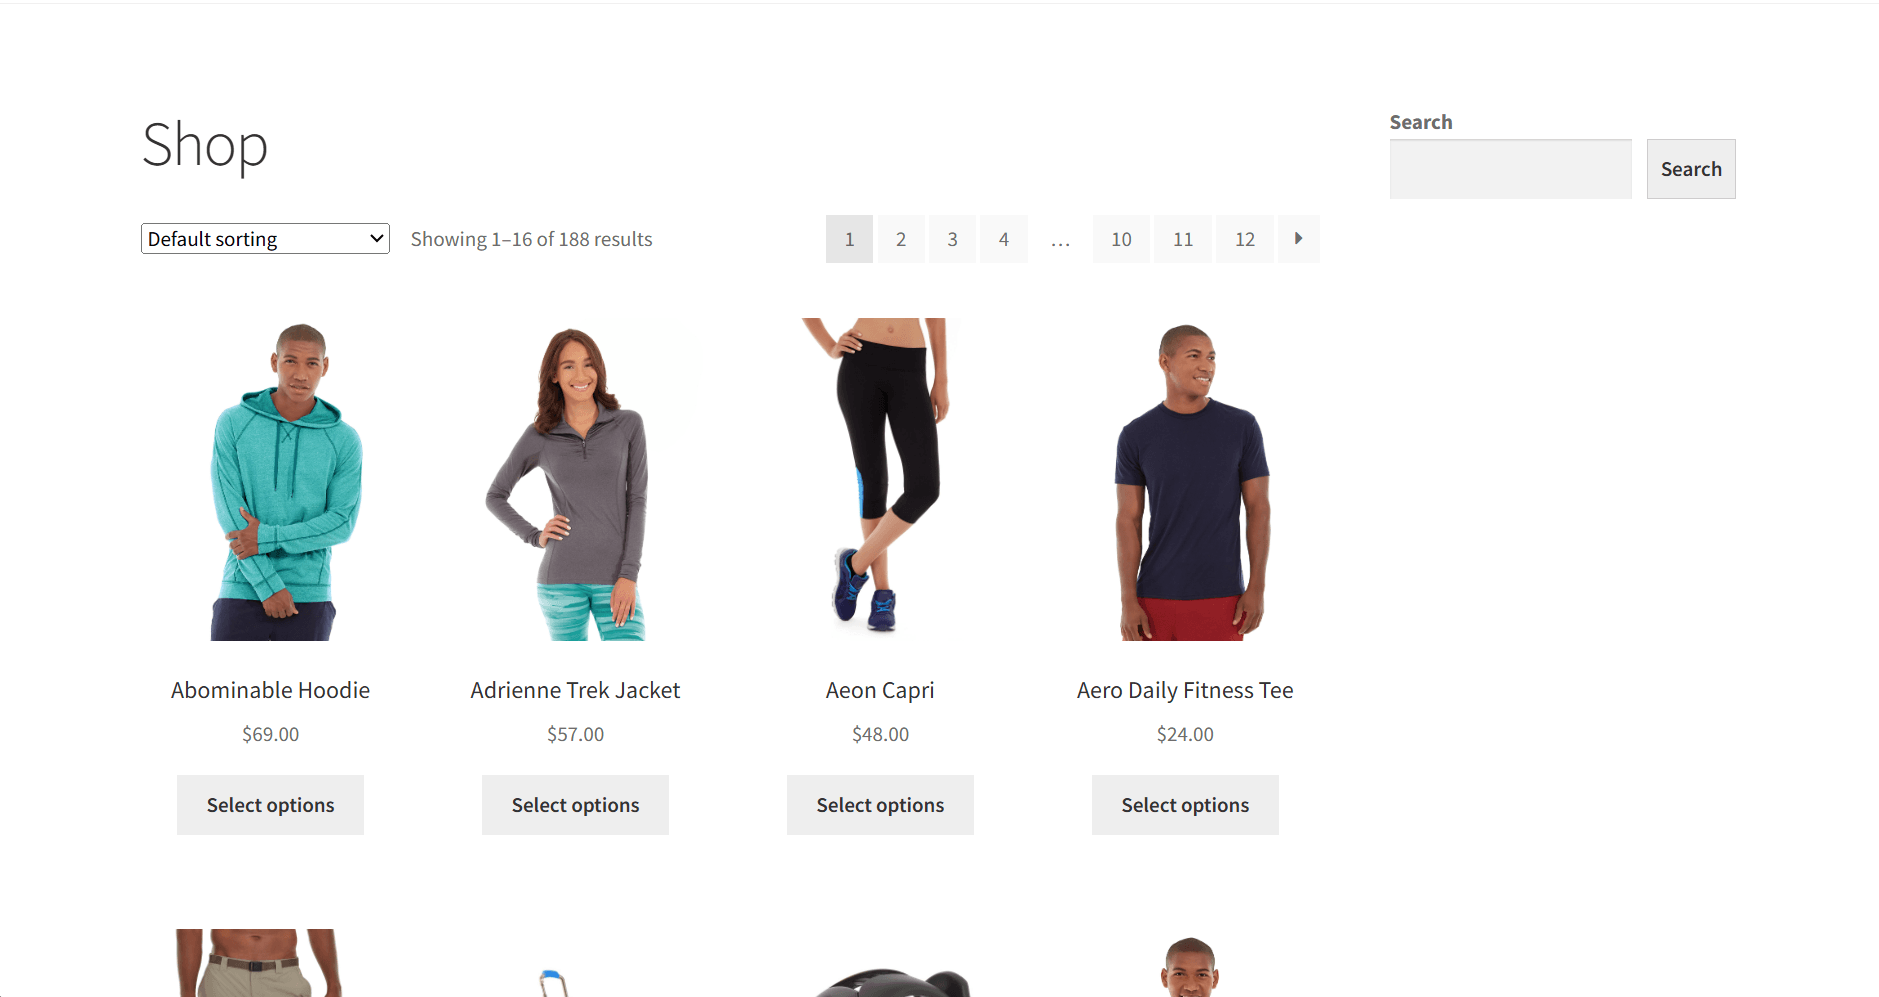
You'll use the scraping course e-commerce page as the target.
Step 1: Import CheerioCrawler And Dataset
Create a file named scraper.js in the srcdirectory. Then open it and import the required libraries. Also, create and open the dataset you will use to store the scraped data.
import { CheerioCrawler, Dataset, log } from 'crawlee';

// open a dataset to store scraped data (creates folder under storage/datasets/)
const dataset = await Dataset.open('ecommerce-list');
CheerioCrawler will handle fetching pages and parsing the HTML. Dataset.open() creates a dataset folder under storage/datasets/ecommerce-list/ and prepares it for writing extracted records during the crawl.
Step 2: Extract Data With Cheerio Selectors
Next, create a crawler instance and implement the request handler. Use Cheerio’s $ selectors to extract products from the Scraping Course e-commerce page. Each product sits inside an li.product element.
The handler targets the product name using the heading selector, then extracts the product URL, price, and image for every item found on the page. It uses multiple CSS selectors for links and prices to make sure extraction works even if the markup changes slightly.
# ...
const crawler = new CheerioCrawler({
  maxRequestsPerCrawl: 50, // limit total number of pages to crawl
  maxConcurrency: 10, // how many pages to process simultaneously
  maxRequestRetries: 2, // retry failed requests up to 2 times
  requestHandlerTimeoutSecs: 30, // timeout for each page processing

  async requestHandler({ request, $, enqueueLinks }) {
    // log the current page being processed
    log.info(`List page ${request.loadedUrl}`);

    // collect all items from the page
    const items = [];

    // find all product list items on the page
    $('li.product').each((_, el) => {
      // extract product name from the heading
      const name = $(el).find('h2.woocommerce-loop-product__title').text().trim();

      // extract product url, trying multiple possible selectors
      const url =
        $(el).find('a.woocommerce-LoopProduct-link').attr('href') ||
        $(el).find('a.woocommerce-loop-product__link').attr('href') ||
        $(el).find('a').first().attr('href') ||
        null;

      // extract price, trying multiple possible selectors
      const price =
        $(el).find('.price .woocommerce-Price-amount').first().text().trim() ||
        $(el).find('.price').first().text().trim() ||
        null;

      // extract product image url
      const image = $(el).find('img').first().attr('src') || null;

      // only add items that have both name and url
      if (!name || !url) return;

      // add item to the collection
      items.push({ name, price, url, image, listUrl: request.loadedUrl });
    });
This crawler instance retrieves all products on the page, extracts the relevant fields, and stores them in an array for the next step. The code logs each processed page using log.info() so you can track crawl progress.
Step 3. Save Extracted Items To The Dataset
Once you’ve collected all product details from the current page, save each item as a separate entry in the dataset. Crawlee’s best practice is to push each record individually. This way, each product appears as its own JSON file.
# ...
// save each item separately
for (const item of items) {
  await dataset.pushData(item);
}
Every call to dataset.pushData(item) writes one product into your dataset. This keeps your output organized and easy to load for analysis later.
Step 4. Crawl Pagination With enqueueLinks()
After extracting products from the current page and saving them to the dataset, instruct the crawler to follow pagination links so it can move beyond the first page. Use enqueueLinks to select only the pagination elements you want. This keeps the crawl scoped to the product list without drifting to unrelated parts of the site.
# ...
    // find and add pagination links to the queue for crawling
    await enqueueLinks({
      selector: 'a.page-numbers, a.next, a.prev', // select pagination links
    });
  },
});
This code discovers all pagination links at the bottom of the product list and queues them for further crawling. Crawlee will stop after processing the number of pages you set in the maxRequestsPerCrawl variable.
Now run the crawler starting from the e-commerce homepage.
# ...
// start crawling
await crawler.run(['https://www.scrapingcourse.com/ecommerce/']);
The code will process the homepage, follow pagination links, extract products, and save each result in your dataset.
Here is the full code:
import { CheerioCrawler, Dataset, log } from 'crawlee';

// open a dataset to store scraped data (creates folder under storage/datasets/)
const dataset = await Dataset.open('ecommerce-list');

// create a cheerio crawler (fast, lightweight, but doesn't execute JavaScript)
const crawler = new CheerioCrawler({
  maxRequestsPerCrawl: 50, // limit total number of pages to crawl
  maxConcurrency: 10, // how many pages to process simultaneously
  maxRequestRetries: 2, // retry failed requests up to 2 times
  requestHandlerTimeoutSecs: 30, // timeout for each page processing

  async requestHandler({ request, $, enqueueLinks }) {
    // log the current page being processed
    log.info(`List page ${request.loadedUrl}`);

    // collect all items from the page
    const items = [];

    // find all product list items on the page
    $('li.product').each((_, el) => {
      // extract product name from the heading
      const name = $(el).find('h2.woocommerce-loop-product__title').text().trim();

      // extract product url, trying multiple possible selectors
      const url =
        $(el).find('a.woocommerce-LoopProduct-link').attr('href') ||
        $(el).find('a.woocommerce-loop-product__link').attr('href') ||
        $(el).find('a').first().attr('href') ||
        null;

      // extract price, trying multiple possible selectors
      const price =
        $(el).find('.price .woocommerce-Price-amount').first().text().trim() ||
        $(el).find('.price').first().text().trim() ||
        null;

      // extract product image url
      const image = $(el).find('img').first().attr('src') || null;

      // only add items that have both name and url
      if (!name || !url) return;

      // add item to the collection
      items.push({ name, price, url, image, listUrl: request.loadedUrl });
    });

    // save each item separately (crawlee best practice - one item per json file)
    for (const item of items) {
      await dataset.pushData(item);
    }

    // find and add pagination links to the queue for crawling
    await enqueueLinks({
      selector: 'a.page-numbers, a.next, a.prev', // select pagination links
    });
  },
});

// start crawling from the ecommerce homepage
await crawler.run(['https://www.scrapingcourse.com/ecommerce/']);
Run your script using Node from the project root:
node src/scraper.js
Once the crawl completes, you should find JSON records for every product Crawlee scraped across all catalog pages in storage/datasets/ecommerce-list/. Here is a sample record.
{
	"name": "Abominable Hoodie",
	"price": "$69.00",
	"url": "https://www.scrapingcourse.com/ecommerce/product/abominable-hoodie/",
	"image": "https://www.scrapingcourse.com/ecommerce/wp-content/uploads/2024/03/mh09-blue_main.jpg",
	"listUrl": "https://www.scrapingcourse.com/ecommerce/"
}
Bravo, you successfully scraped the product catalogue. But what happens when you try the same approach on a target that renders its contents using JavaScript?
If you try to scrape a page that builds its content with JavaScript using the same CheerioCrawler approach, your results will look very different. You’ll get either no product records or a set of empty results. That’s because CheerioCrawler only parses the raw HTML response sent by the server.
Whenever you notice blank or missing data in your extraction output, check whether the content is being rendered by JavaScript. If that's the case, you’ll need a browser crawler to capture the fully rendered page.
Web Scraping With Crawlee Local Browser Crawlers
Crawlee supports two local browser crawler classes. PlaywrightCrawler that uses Playwright under the hood, and PuppeteerCrawler that uses Puppeteer.
The crawl pattern stays the same as CheerioCrawler. Limits like concurrency and retries are configured in the crawler options. Extraction still happens inside a requestHandler, and records are still written to a dataset. The main change is the extraction surface. Instead of Cheerio’s $, extraction comes from page.
Let's now switch the target site to the Scraping Course JavaScript-rendered catalog page.
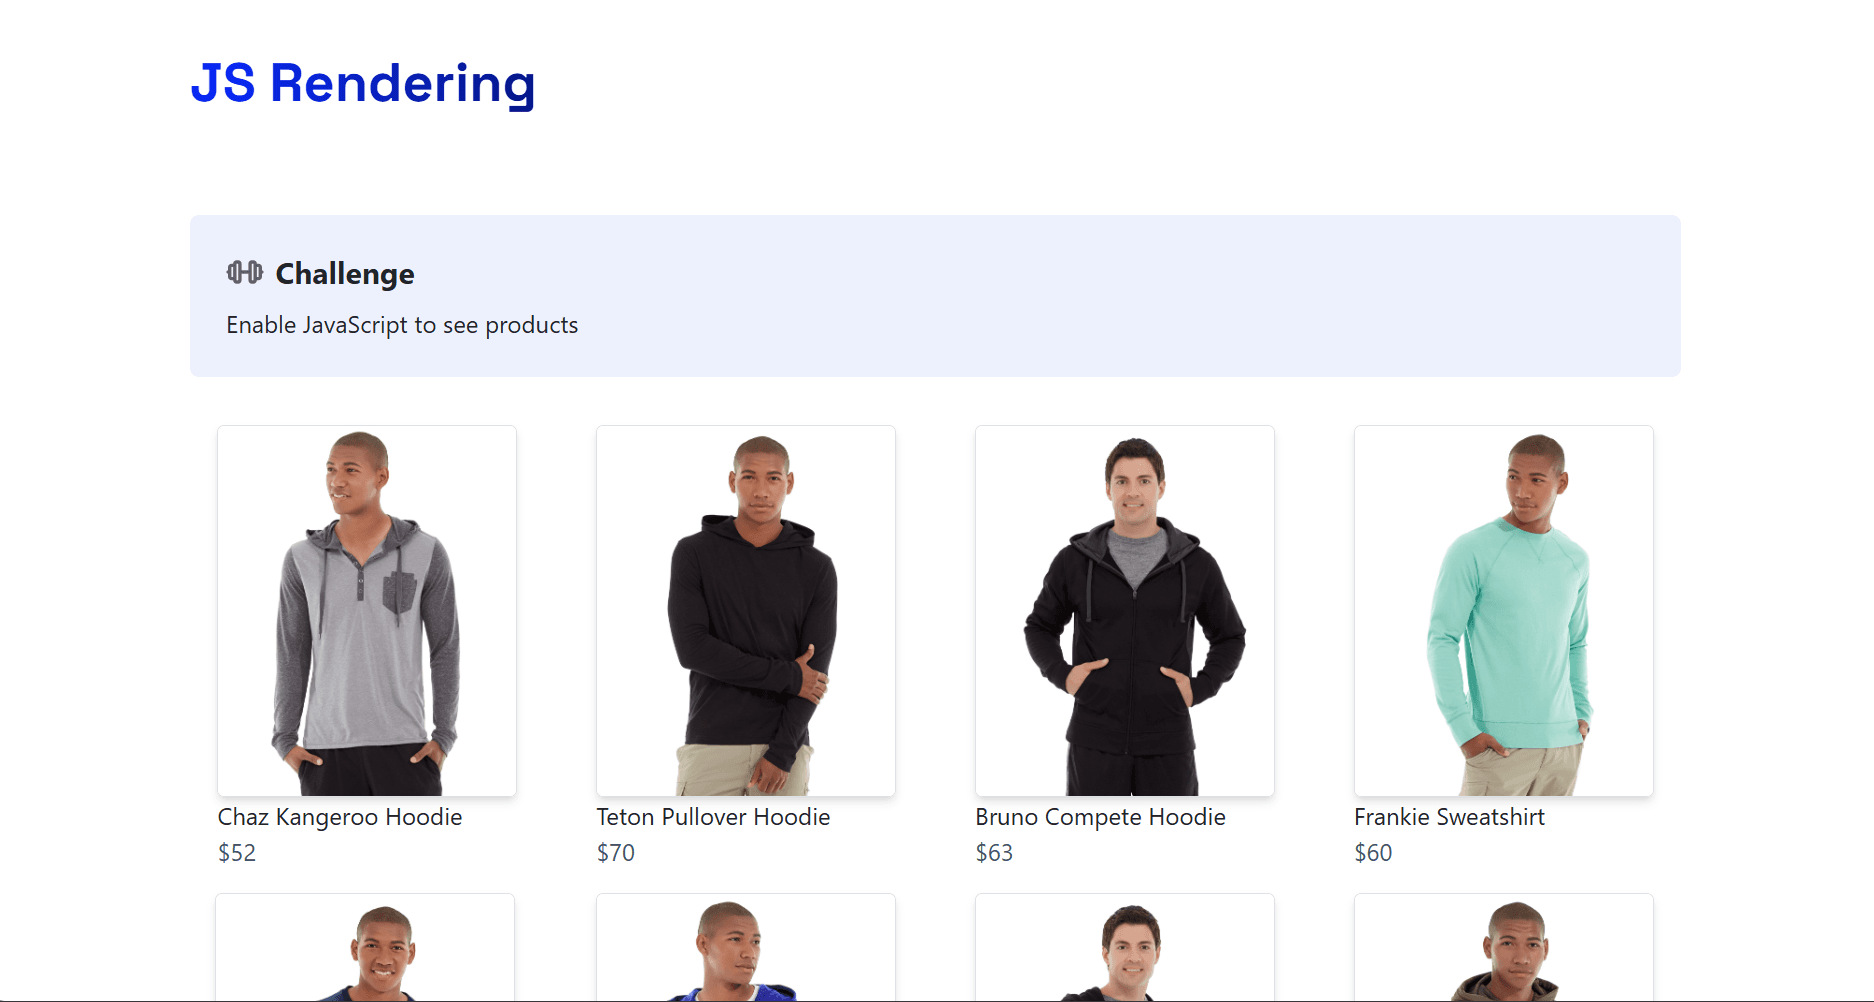
The product grid is created after the page loads, so the crawler must run in a browser and wait for the DOM to render before extracting fields. You also need to switch the selectors to match the ones the new target page uses.
import { PlaywrightCrawler, Dataset, log } from 'crawlee';

// open a dataset to store scraped data (creates folder under storage/datasets/)
const dataset = await Dataset.open('js-rendering-rendered');

// create a playwright crawler
const crawler = new PlaywrightCrawler({
  maxRequestsPerCrawl: 10, // limit total number of pages to crawl
  maxConcurrency: 5, // how many browser instances to run simultaneously
  maxRequestRetries: 2, // retry failed requests up to 2 times
  requestHandlerTimeoutSecs: 60, // timeout for each page processing

  async requestHandler({ request, page }) {
    // log the current page being processed
    log.info(`Rendered page ${request.loadedUrl}`);

    // wait for products to load
    await page.waitForSelector('.product-item', { timeout: 20000 });

    // extract all product data from the page using browser's JavaScript execution
    const items = await page.$$eval('.product-item', (els) =>
      els.map((el) => {
        // find the product link and image elements
        const linkEl = el.querySelector('.product-link');
        const imgEl = el.querySelector('.product-image');

        // get the text content - product name and price are in the link text
        const textContent = linkEl?.textContent?.trim() || '';
        // the format is "Name $price" - extract price using regex
        const priceMatch = textContent.match(/\$\d+/);
        const price = priceMatch ? priceMatch[0] : null;
        // remove the price from text to get just the name, also clean up extra whitespace
        const name = textContent.replace(/\$\d+/, '').replace(/\s+/g, ' ').trim();

        // extract url and image src
        const url = linkEl?.href || null;
        const image = imgEl?.src || null;

        // return item data
        return { name: name || null, price, url, image };
      }),
    );

    // filter out items that have no useful data (all fields are null/empty)
    const validItems = items.filter((item) => item.name || item.price || item.url || item.image);

    // save each item separately
    for (const item of validItems) {
      await dataset.pushData(item);
    }

    // log how many items were extracted
    log.info(`Extracted ${validItems.length} items`);
  },
});

// start crawling from the JavaScript rendering challenge page
await crawler.run(['https://www.scrapingcourse.com/javascript-rendering']);
This code waits for .product-item because the initial HTML doesn’t include the product tiles. The page adds them after it runs its client-side scripts. Once the selector appears, extraction runs against the rendered DOM using page APIs. It then extracts the name, price, url, and image and stores them in the dataset.
When you run the code, Crawlee writes the extracted items under storage/datasets/js-rendering-rendered/.
{
	"name": "Chaz Kangeroo Hoodie",
	"price": "$52",
	"url": "https://scrapingcourse.com/ecommerce/product/chaz-kangeroo-hoodie",
	"image": "https://scrapingcourse.com/ecommerce/wp-content/uploads/2024/03/mh01-gray_main.jpg"
}
Each JSON file contains one product record similar to this.
How to Use Proxies with Crawlee
Proxies are optional. Add them when a target rate limits by IP or blocks data center ranges. If data center or free proxy IPs get blocked, switch to residential proxies. Residential IPs come from Internet service providers, so they tend to last longer on targets that filter hosting providers.
import { CheerioCrawler, ProxyConfiguration } from 'crawlee';

const proxyConfiguration = new ProxyConfiguration({
  proxyUrls: [
    'http://USERNAME:PASSWORD@proxy-1.example.com:8000',
    'http://USERNAME:PASSWORD@proxy-2.example.com:8000',
  ],
});

const crawler = new CheerioCrawler({
  proxyConfiguration,
  async requestHandler({ request, $ }) {
    // extraction logic
  },
});
This creates a ProxyConfiguration and passes it to the crawler. Crawlee then routes crawler traffic through the proxy pool automatically, so the request handler doesn’t change. If you need to confirm which proxy was used for a request, Crawlee exposes proxy metadata in the handler context.
Crawlee vs. Scrapy
Crawlee and Scrapy both help you run crawls with pagination, retries, and concurrency. The decision comes down to your runtime and how often you need browser rendering.
| Attribute | Crawlee | Scrapy |
|---|---|---|
| What it is | A crawling and browser automation library built around crawler classes and a handler-based crawl loop. Available for Node.js and also as an official Python library. | A Python crawling framework built around spider classes, a scheduler/engine flow, and item pipelines for post-processing and persistence. |
| Primary ecosystems | JavaScript and TypeScript (Node.js), plus Python. | Python. |
| Core abstraction | Crawler class plus a request handler per page. | Spider class plus requests and responses, with item pipelines for item processing. |
| HTTP-first crawling | Supported and commonly used. | Supported and commonly used. This is the default model. |
| JavaScript rendering | Supported through browser-driven crawlers and a page-based extraction surface. | Supported through third-party integrations such as Scrapy-Playwright or Scrapy Flash. You can also use the Scrapy-Zenrows middleware for full JavaScript support |
| Concurrency and runtime model | Configured at the crawler level, aligned with the runtime you are using (Node.js or Python). | Built on Twisted by default, which shapes how concurrency and async integrations work. |
| Where it fits best | When you want the same crawl shape across HTTP and browser runs, or when your project is already in JavaScript or TypeScript. It also fits if you want that same Crawlee approach in Python. | When you want Scrapy’s spider and pipeline architecture, and your downstream processing is Python-native. |
Pick Crawlee when your target renders content dynamically via JavaScript, or when you want a consistent crawl pattern across HTTP and browser extraction. Pick Scrapy when your target renders static HTML, or you don't mind using third-party tools like Scrapy-Flash to render dynamic content in Scrapy. Scrapy is also ideal if you want a spider-plus-pipeline architecture for long-running crawls and Python-first processing.
Crawlee Limitations
Anti-bots still block self-managed traffic. 403 responses and challenge pages can appear with both HTTP and browser crawlers because the target is evaluating your IP reputation, session behavior, headers, request rate, browser fingerprints, and more.
Let’s see how Crawlee’s Playwright-based crawler behaves against the Anti-bot Challenge page.
import { PlaywrightCrawler, log } from 'crawlee';

const crawler = new PlaywrightCrawler({
  maxRequestsPerCrawl: 1,
  maxConcurrency: 1,

  async requestHandler({ request, page }) {
    const title = await page.title().catch(() => '');
    const html = await page.content();

    log.info(`Fetched ${request.loadedUrl}`);
    log.info(`Page title: ${title}`);

    const snippet = html.replace(/\s+/g, ' ').slice(0, 500);
    console.log(snippet);
  },
});

await crawler.run(['https://www.scrapingcourse.com/antibot-challenge']);
When you run the script, Crawlee returns a 403 response, indicating the request is being blocked. After retrying a few times, it reaches the maximum retries and fails.
INFO PlaywrightCrawler: Starting the crawler.
WARN PlaywrightCrawler: Request blocked - received 403 status code.
WARN PlaywrightCrawler: Retrying request. {"url":"https://www.scrapingcourse.com/antibot-challenge","retryCount":1}

<! ... other retries omitted for brevity ... !>
ERROR PlaywrightCrawler: Request failed and reached maximum retries. Error: Request blocked - received 403 status code.
<! ... rest omitted for brevity ... !>
Also, scaling adds operational work. As queues and storage grow, execution slows, and failures become more frequent. Long crawls surface more timeouts, retries, and partial extractions.
Fixing these scraping blocks usually requires per-site tuning of proxies, session reuse, retries, fingerprints, and more. Unfortunately, results can still fluctuate with these workarounds.
At this point, a Web Scraping API is the better choice. It offloads proxy management, anti-bot handling, and browser execution so you can focus on extraction and downstream workflows instead of maintaining the scraping infrastructure.
Solving Crawlee's Limits With a Web Scraping API
An auto-managed web scraping API, such as ZenRows, handles all scraping blockers behind the scenes. This reduces the time you spend debugging scraping issues, saves engineering time and resources, and lets you focus on business logic and data fine-tuning.
ZenRows features a Universal Scraper API that excels at large-scale scraping, combining JavaScript rendering, premium proxies, session support, CSS selector extraction, anti-bot handling, etc into a single endpoint.
To use it, sign up, then open the ZenRows Request Builder and paste the ScrapingCourse anti-bot challenge URL into the URL field. Then enable JavaScript rendering and Premium Proxies.
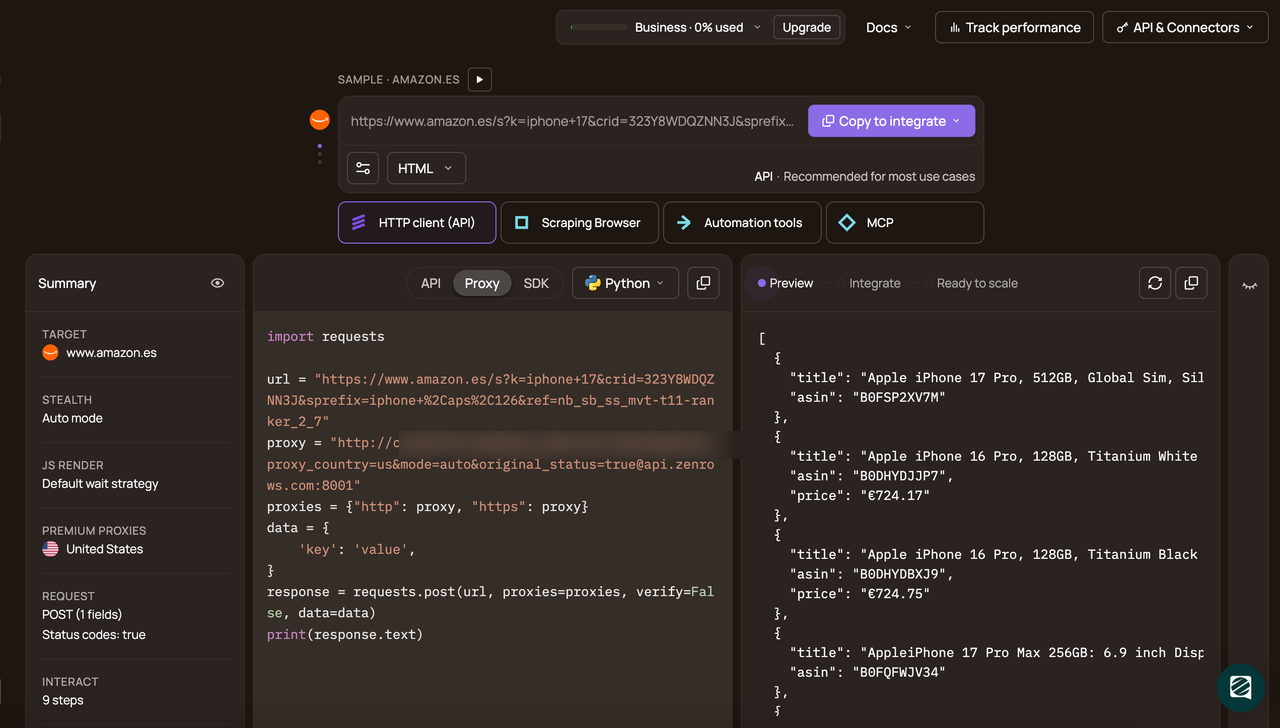
Choose API connection mode and set the programming language to Node.js. Then copy the generated code.
// npm install axios
const axios = require('axios');

const url = 'https://www.scrapingcourse.com/antibot-challenge';
const apikey = '<YOUR_ZENROWS_API_KEY>';
axios({
	url: 'https://api.zenrows.com/v1/',
	method: 'GET',
	params: {
		'url': url,
		'apikey': apikey,
		'js_render': 'true',
		'premium_proxy': 'true',
	},
})
    .then(response => console.log(response.data))
    .catch(error => console.log(error));
When you run the code, you get rendered HTML that includes the product grid, product name, and price, like this:
<html lang="en">
<head>
    <!-- ... -->
    <title>Antibot Challenge - ScrapingCourse.com</title>
    <!-- ... -->
</head>
<body>
    <!-- ... -->
    <h2>
        You bypassed the Antibot challenge! :D
    </h2>
    <!-- other content omitted for brevity -->
</body>
</html>
Congratulations! 🎉 You’ve just bypassed the ScrapingCourse anti-bot challenge with a single ZenRows request. Without dealing with proxies, browser setup, or anti-bot roadblocks.
Since ZenRows renders JavaScript and returns the final HTML while handling proxies, sessions, and anti-bot responses, it’s an easy way to make a Crawlee scraper more reliable without rebuilding it.
Keep Crawlee for crawling and queueing, then call the ZenRows API inside requestHandler instead of fetching the target URL directly. You keep the same handlers, pagination logic, and dataset writes, but bypass antibots with Zenrows.
Conclusion
In this article, you learned how Crawlee’s crawl loop works, how to choose between HTTP and browser crawling, and how to manage pagination and storage. Crawlee works well when you want to build and control the full scraping flow yourself. It’s a good choice for small to medium crawls, where you can manage retries, pagination, and the occasional JavaScript page.
As the crawl grows, blocks and instability show up more often, and keeping proxies, sessions, and browser runs healthy becomes ongoing work. ZenRows is a better fit for large-scale scraping because it returns the final HTML while handling proxies, sessions, JavaScript rendering, and anti-bot responses, so your pipeline spends less time failing and recovering.
Try ZenRows for free now or speak with sales!
FAQ
Why can’t CheerioCrawler extract JavaScript-rendered items?
CheerioCrawler only parses the raw HTML returned by the server. If the page renders the product grid with JavaScript after load, the markup isn’t in that HTML, so selectors return empty results.
When should I switch from Crawlee CheerioCrawler to a browser-based crawler?
Switch when you notice the site uses JavaScript rendering and the data is missing in the initial HTML. Typical signs are empty fields, missing lists, or a page that looks complete in the browser but sparse in View Source.
Why do browser crawlers still hit 403 responses or challenge pages?
Rendering JavaScript doesn’t fix IP reputation or traffic patterns. Anti-bots can still block based on IP range, request rate, headers, and session behavior, so 403 responses and challenge pages can appear. If you need a high success rate while scraping, use a Web Scraping API like ZenRows, which handles all anti-bot blocks behind the scenes.
How can I reliably scrape at scale using Crawlee?
Control concurrency, pace requests, reuse sessions where needed, and rotate proxies when throttling starts. If blocks become the main problem, call ZenRows for the fetch step inside requestHandler so it returns the final HTML while handling proxies, sessions, rendering, and anti-bot responses.
Which is the best web crawling tool?
Open source options include Crawlee, Scrapy, Playwright, Puppeteer, and Selenium. They handle crawling and extraction, but they don’t remove anti-bot friction, so you still manage proxies, sessions, and block recovery. For large-scale scraping where blocks are common, a Web Scraping API such as ZenRows is often a better alternative because it returns HTML or structured output while handling those obstacles.